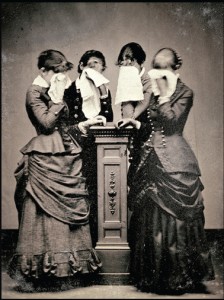
Mourning, Victorian Style
Mourning, Victorian Style
When I first started planning the 1883 Victorian walking dress, I came across a photo of Victorian ladies in mourning. Apparently, photographing people displaying their grief was common; they wanted a way to memorialize that part of their lives. I was fascinated by the photo. I started researching mourning etiquette, wanting to learn more. The Victorians took mourning very seriously; at first, that seems very morbid. But, it serves a very important point. It gives people the time and the right to grieve; to process and to mourn and to wallow. They moved through the various stages of mourning, which were set based on the relationship of the mourner to the griever. A person mourning a spouse might embrace the mourning garments and etiquette for as long as four years. Clothing and accessories reflected the stages of grief, so others would be able to recognize the stage and act appropriately. As the griever moved through the stages, they were re-introduced into society, able to visit friends and go about their business. Finally, after an appropriate period of time, the mourner would shed the dark mourning garments, return to the colorful and wildly trimmed gowns, and were able to attend parties and other gay social events. The customs of mourning began to fall out of favor during the Civil War, as so many people had died, and nearly everyone wore mourning garments. An already grieving nation was further depressed by the black garments and restricted activities. Queen Victoria's death in 1901 saw a final period of mourning, and after, the mourning customs began to relax. Today, we still wear black to funerals; to show our respect, and to show our somberness.
Since I had just completed a natural-form era dress, I wanted to explore a different era; the bustle era. Because the shape is so different, none of the pieces are interchangeable between the two eras. That meant shopping for more patterns. Yippee!!! : ) This time around, I selected a bodice that had options, so that I could get more use from it. I cut the mock-up as a full jacket with a straight hemline, and 3/4 sleeves.
The biggest difference between this jacket and the lilac natural-form era walking jacket is the back; this one is cut generously to fit over a large bustle:
Everything went together easily, since this was so similar to the previous jacket, and I'd already learned how not to screw things up.
Next, I sewed the overskirt. Normally, I start with the base garments and work my way out, but I really, really wanted to try this overskirt using a few different tecnhiques that I wished I'd used on the walking gown overskirt. First, I selected a fabric with a heavier weight, so that it would drape a little more crisply than the satin; I was concerned that the weight would cause it to hang funny, but I hoped the bustle tapes would correct that. Secondly, I lined the inside back of the garment with a black tulle, which gave a little more structure to the fabric. This skirt went together in two sittings. Prior to taking this photo, I also lined the the jacket, and added boning in at all of the seams so that it would fit closely without excess pulling or wrinkling.
Success!!! The skirt hangs and drapes beautifully!! Relieved, I moved on to the actual bustle, which is a petticoat with a built in cage to support the skirts in a high bustle. I haven't taken any good pictures of just the bustle, I'll add those in the final update (which will hopefully be soon!) I also started the overskirt, to replace the purple one in the above picture. I made the overskirt from the same pinstriped black fabric as the jacket and overskirt, after much internal debate. While the overall garment will be heavy, the matching fabric will look great. And, it gives me more mix and match pieces for my other project, the fantasy Sweeney Scissorhands outfit. : )


